Contents
 Introduction
Deploying OpenWeb UI on Azure allows you to host an interactive AI webpage. However, due to OpenWeb UI’s architecture—where both the frontend and backend are housed in a single container—scalability is limited. This guide will walk you through setting up OpenWeb UI using Azure Container Apps, discuss its limitations regarding scaling, and compare this solution to using Kubernetes.
 Prerequisites
Before starting, make sure you have the following:
- Azure Account: An active Azure subscription with permissions to create new resources.
-
OpenWeb UI Container Image: The container image from GitHub Container Registry (
ghcr.io/open-webui/open-webui:main). - OpenAI API Key: [Optional] In order to utilize OpenAI in OpenWeb UI, you will need an OpenAI API Key. https://platform.openai.com/api-keys
 Setting Up OpenWeb UI with Azure Container Apps
Step-by-Step Guide (Portal)
1. Access the Azure Portal
Log in to Azure Portal.
2. Create a Resource Group
- Search for Resource groups and create a new one named
OpenWebUI-ContainerApp-RG. - Select a region like East US be sure you are consistent with the region through this guide.
3. Create a Storage Account
- Search for Storage accounts, create a new one (For example:
openwebuistorageaccount(lowercase required)) in theOpenWebUI-ContainerApp-RGresource group.-
During creation of the Storage account there are configuration changes required:
-
Basics tab
-
Primary service select
Azure Files. -
Performance you can set
Standardunless you have a specific need forPremium. -
Redundancy you can set
Locally-redundant storage (LRS)unless you have a specific need for the other options.
-
Primary service select
-
Networking tab
-
Network access select
Enable public access from all networks(default option) unless you have a specific need for the other options (the other options require additional configuration which will not be covered in this guide).
-
Network access select
-
Other tabs
- Leave the defaults and create the storage account.
-
Basics tab
-
After the storage account is created there are additional steps required:
- Search for Storage accounts. Locate the storage account (openwebuistorageaccount) and select it.
- Expand Data storage and go to the File shares blade. Add a new file share.
-
Name set to
ai-storage-file-share. - For Access tier select
Transaction optimized. - On the Backup tab I disable backup, as I do not want to incur any additional charges. But if you can afford it, keep it enabled to keep your files safe in the event of data loss.
- Create the file share.
-
Name set to
-
4. Create a Container App
Search for Container Apps, create a new container app.
-
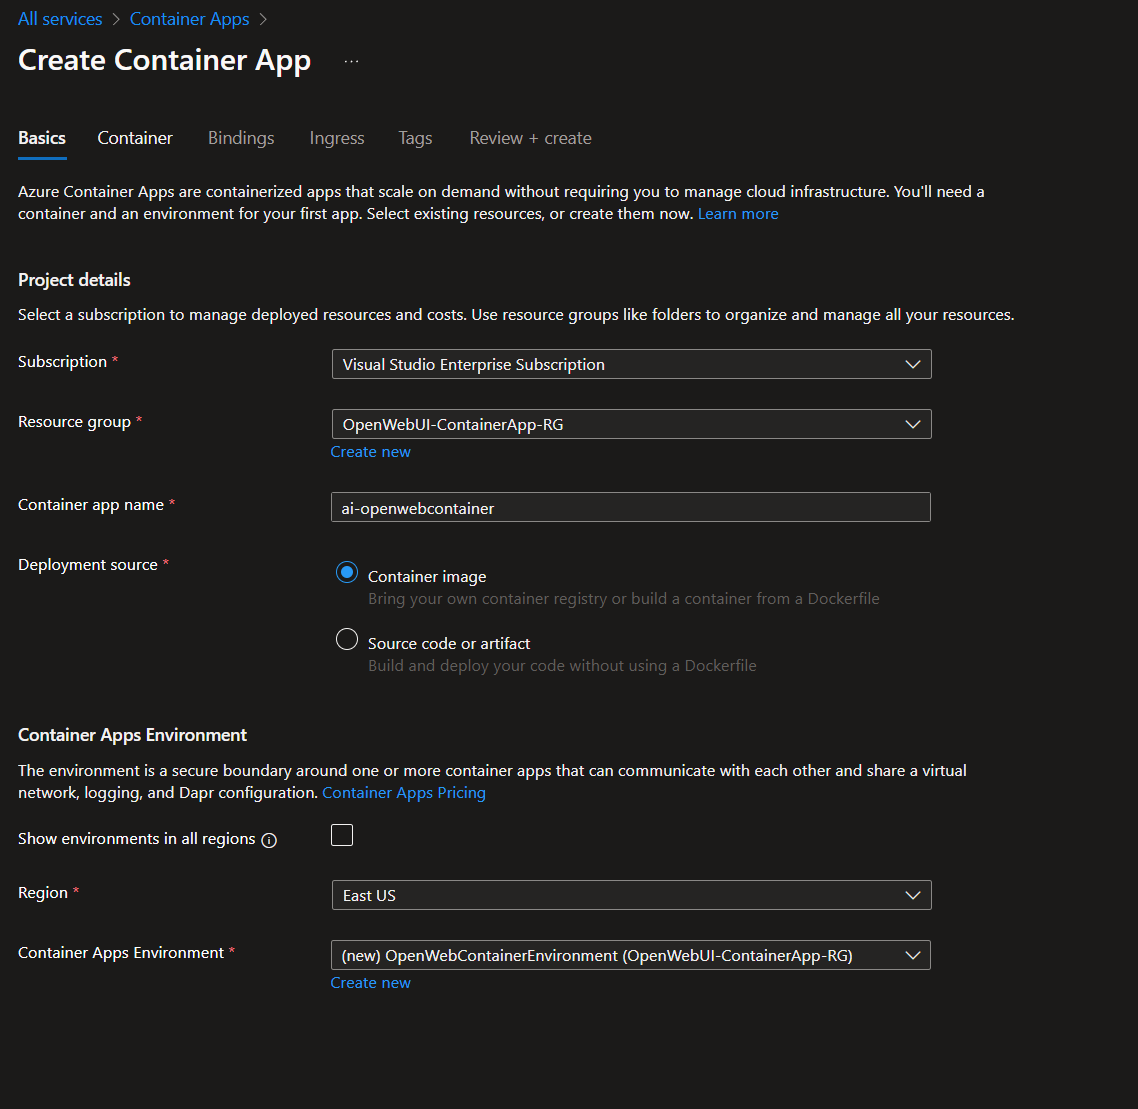
Basics tab
-
Container app name set the name to
ai-openwebcontainer. -
Deployment source set to
Container image. -
Region set
East US. -
Container Apps Environment create a new container apps environment. There is additional configuration needed for the container app environment:
- Set the Environment Name to
OpenWebContainerEnvironment. - Leave the rest of the options as the defaults.
-
Create the Container Apps Environment.
- Set the Environment Name to
-
Container app name set the name to
-
Proceed to Next: Container.
-
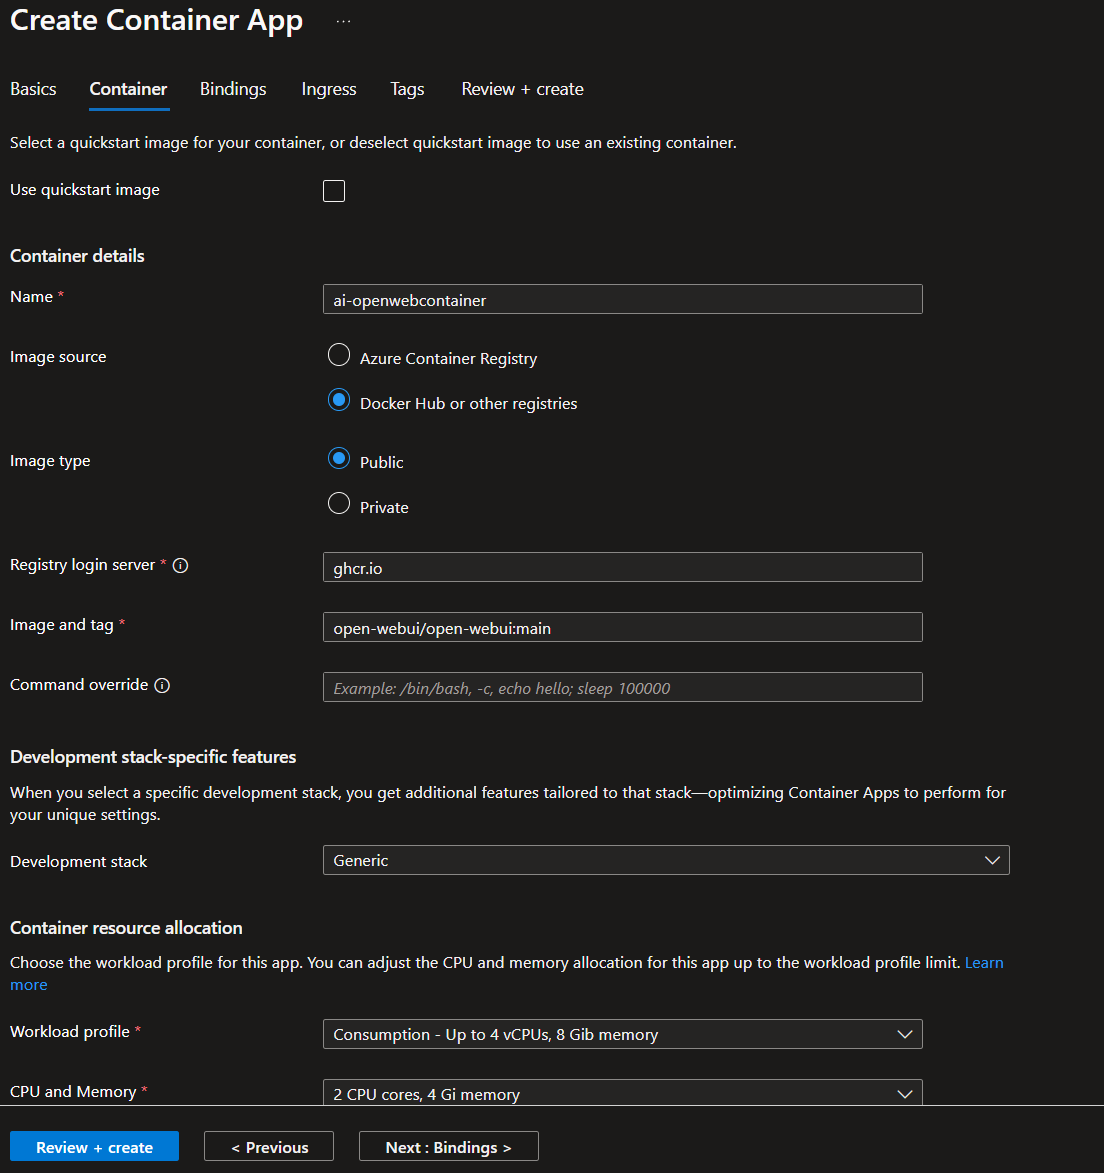
Container tab
-
Image source set to
Docker Hub or other registries -
Image type set to
Public -
Registry login server set to
ghcr.io -
Image and tag set to
open-webui/open-webui:main -
CPU and Memory set to what you are comfortable with, I set to
2 CPU cores, 4 Gi memorybut this can be lower if needed. -
Leave the rest of the options as the defaults (we will configure the environmental variables in a few steps).
-
Image source set to
-
Proceed to Next: Bindings.
-
Bindings tab
- Nothing needs to be modified on this tab.
-
Proceed to Next: Ingress.
-
Ingress tab
- Toggle Ingress to
Enabled -
Ingress traffic set to
Accept traffic from anywhere: Applies if 'internal' setting is set to false on the Container Apps environment -
Ingress Type set to
HTTP -
Target port set to
8080 - Leave the rest of the options as the defaults.
- Toggle Ingress to
- Select Review + create to create the Container App.
5. Gather data from Storage Accounts
- Search for Storage accounts, select the storage account we created openwebuistorageaccount.
- Expand Security + networking and select Access keys.
- Click show on one of the 2 keys listed, copy one for us to use in the next step.
6. Link Azure Files to Container Apps Environment
- Search for Container Apps Environments.
- Expand Settings, then select Azure Files, we are going to Add a new file share to the container apps environment.
-
Name set a name (
openwebcontainerfileshare) for the file share in the container apps environment.-
Storage account name set to
openwebuistorageaccount - Storage account key set to the access key we copied in the previous step.
-
File Share set to
ai-storage-file-share -
Access mode set to
Read/Write
-
Storage account name set to
-
Name set a name (
7. Mount Azure File Share to Container App
- Search for Container Apps, select the container app we created ai-openwebcontainer
- Expand Application, select Containers. Select Edit and deploy.
- First, you will need to select the Volumes tab.
-
Volumes tab
- Select + Add
-
Volume type set to
Azure file volume -
Name set to whatever name you would like (I used
ai-openweb-volume). -
File share select the file share we created
openwebcontainerfileshare -
Mount options set to
nobrlmore information
- Now select the Container tab.
-
Container tab
-
Name / suffix set the name of the revision to something you will recognize. (I used
live) - Click on the container image
ai-openwebcontainershown in the Container Image table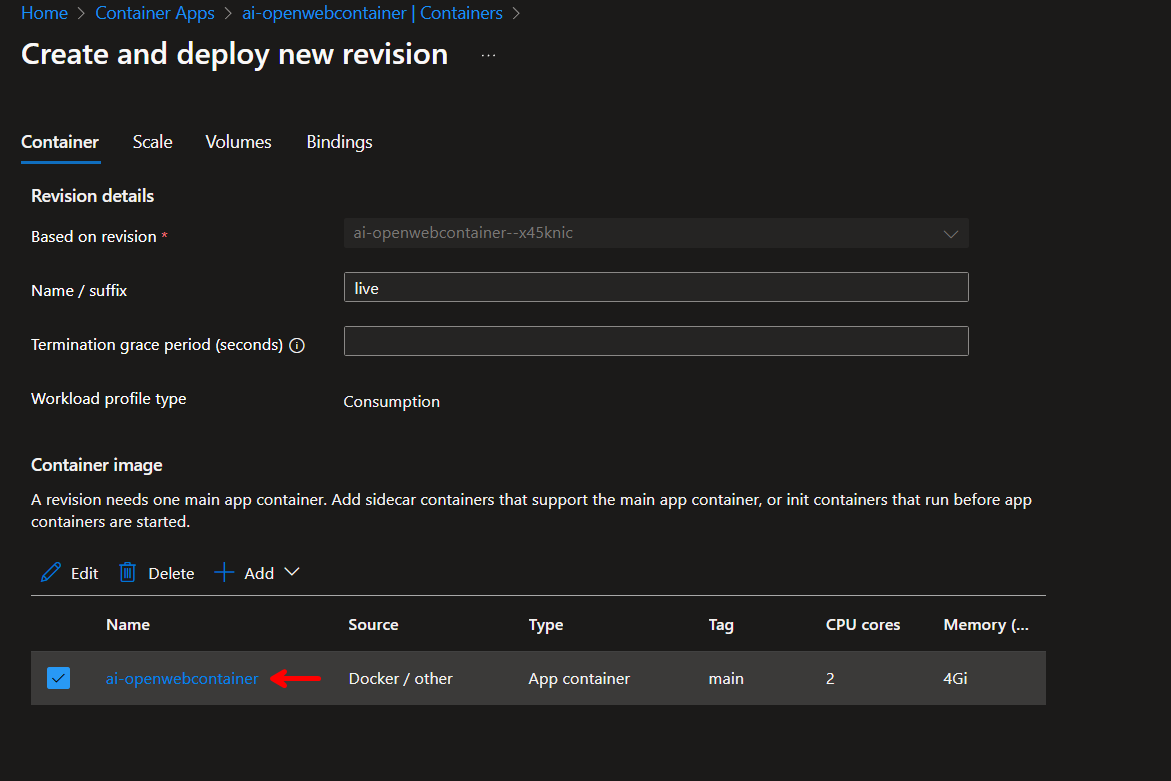
- The Edit a container menu will open.
- In the Basics tab you can add your Environment variables at the bottom of the tab. Here are all the environmental variables that OpenWeb UI Supports: https://docs.openwebui.com/getting-started/env-configuration/
- Add a new environmental variable (keep in mind this method will expose your API key in plain text. If you want security you need to save it as a secret):
-
Name:
OPENAI_API_KEY -
Source:
Manual entry -
Value:
<OpenAI-API-Key>https://platform.openai.com/api-keys
-
Name:
- Add a new environmental variable (keep in mind this method will expose your API key in plain text. If you want security you need to save it as a secret):
- Select the Volume mounts tab.
- Select the dropdown under volume name and select the Azure file volume that we created in the Volumes tab.
-
Volume name:
ai-openweb-volume -
Mount path:
/app/backend/data - Sub path (optional): Leave this empty
-
Volume name:
- Click save
- In the Basics tab you can add your Environment variables at the bottom of the tab. Here are all the environmental variables that OpenWeb UI Supports: https://docs.openwebui.com/getting-started/env-configuration/
-
Name / suffix set the name of the revision to something you will recognize. (I used
-
Lastly, you will need to select the Scale tab.
-
Scale tab
-
Min replicas set to
1(If you want the instance to spin up on demand and deallocate when not in use, set this to0instead. Personally, I prefer the application to remain running, so I don’t have to wait for Azure Container Apps to activate the container.) -
Max replicas set to
1(the max cannot be more than 1 due to design of Docker container for OpenWeb UI)
-
Min replicas set to
- Select Create to create the revision.
8. Access the Application:
- In the Container App view, expand Application and select Revisions and replicas.
- Click the Active revision that ends with
live(or whatever you configured your revision name to) - In the Revision details menu select the Revision URL this is the published URL for your container app revision. (the main URL is in the Overview blade of your container app. Its called the Application Url.)
 Scaling Limitations of OpenWeb UI
Due to OpenWeb UI’s architecture, where both frontend and backend are housed in the same container, scaling the application horizontally (adding more replicas) is problematic. Here’s why:
- Single Container Design: The combined frontend and backend make it difficult to scale individual components like you would in a decoupled architecture.
- Session Handling: Without advanced session management, multiple instances of the backend can cause inconsistent behavior, as there’s no mechanism to manage session persistence across replicas.
- Best Fit: For now, deploying OpenWeb UI with 1 replica in Azure Container Apps is the most efficient way to ensure stability.
Possible Solutions
- Decoupling Services: If you want to scale, consider splitting the frontend and backend into separate containers and using Kubernetes for scaling them independently.
- Kubernetes Deployment: Kubernetes can help manage scaling by separating components, introducing load balancing, and handling session persistence. However, this adds complexity and cost.
 Cost-Effective Hosting: Container Apps vs. Kubernetes
When comparing Azure Container Apps and Azure Kubernetes Service (AKS), here’s what you need to know about cost-effectiveness:
Azure Container Apps
- Serverless Pricing: You only pay for the CPU and memory your app uses. It’s cost-efficient for small to medium workloads and apps with unpredictable traffic.
- Low Management Overhead: Azure manages the underlying infrastructure, so there’s no need to worry about managing virtual machines (VMs), which reduces operational costs.
- Best Use: Ideal for apps like OpenWeb UI that don’t require complex scaling and benefit from Azure’s autoscaling features.
Azure Kubernetes Service (AKS)
- VM-Based Pricing: You pay for VMs even when your app is idle. Scaling adds complexity since you need to manage pods, nodes, and networking.
- Scalability: While AKS offers more flexibility in scaling, the cost is higher, especially for apps that don’t need continuous scalability.
- Best Use: Suitable for large-scale applications that need fine-grained control over scaling and architecture.
Conclusion: Azure Container Apps is the more cost-effective solution for hosting OpenWeb UI due to its serverless pricing and minimal management requirements. AKS is better suited for complex, highly scalable applications, but it comes with a higher cost and management overhead.
 Conclusion
In this guide, we deployed OpenWeb UI using Azure Container Apps and explored its scalability limitations. For most users, sticking with a single-instance deployment in Container Apps is the most cost-effective and stable approach. If scaling is essential, consider moving to the Kubernetes-based solution where the frontend and backend can be decoupled.
 Feedback
Have you tried deploying OpenWeb UI on Azure? What’s your experience with its scaling capabilities? Share your insights in the comments below.

Share on:
